FAQ
You may have questions, we certainly have answers.
Many questions have been asked of us before. We have listed the answers.

EV Charging Station general
The online chargers (Solar, Smart* and io6*) have four different charging modes:
Basic: The charger charges at the set maximum charging power in the App settings. Note: Dynamic Load Balancing is not used in this mode. If the Sensorbox is installed, this mode cannot be chosen.
Smart*: Charging with Dynamic Load Balancing. The charging station protects your home from overload while charging the car at maximum speed. The charging speed is adjusted based on other electricity consumption in the home or office. This allows you to charge worry-free and as quickly as possible. The charger charges when the available power is higher than the minimum set current in Amps (Minimum Charging Current) and below the maximum power still available on the connection.
SmartSolar*: The charger charges using a combination of solar power and grid power, unless there is enough solar power available. If the minimum current is set to, for example, 6A and there is 4A of solar power available, the charger will supplement this with 2A of grid power in SmartSolar mode. If there is a surplus of 6A or more from the solar panels, the charger will only charge using solar power. This way, you can benefit more from your solar power while the car charges slowly but steadily.
PureSolar*: The charger charges using solar power from the minimum value, usually 6A. If there is a surplus of 6A or more solar power, charging will commence. If the sun is absent for an extended period, charging will pause until there is enough surplus solar power available again.
*For these features, you need the Ratio Sense kit. This can be purchased separately.
In the Ratio App, you can go to advanced settings and click on 'Measured Values'. Do you see positive values at a certain phase at Currents at Sensorbox? On this phase, power is being used from the grid. Is the value negative? There is a surplus of solar power on this phase. With surplus of solar power and a 3-phase solar panel installation, you would see 3 negative values in the App.
Do you see values you don't expect? Contact your installer.
Yes, typically, with a 3-phase PV installation and a 3-phase electric vehicle, you would need 6A per phase to start charging. This means that in the PureSolar mode, you can only start charging with an excess of 4.2 kW of solar power. However, we have a solution for this: In the Ratio App, under 'Advanced Settings', you can change PV charging to 1-phase. By doing so, even if you have a 3-phase PV installation, you can start charging from as low as 1.4 kW in the PureSolar mode. This way, you can benefit much more from charging on solar power throughout the day.
Yes, all Ratio chargers that are standardly equipped with 3-phase (22kW) capability also work with cars that can charge on 1-phase. Additionally, the charger can be installed using only 1-phase.
Yes, our latest Ratio Solar models and all Ratio io6 chargers are suitable for charging on Dynamic energy rates. This way, the charger can be controlled with smart software and start charging at the best/cheapest times. We do this charging on dynamic rates via a free link with Tap Electric. You can link your Ratio charging station via 'OCPP settings' with Tap. Then create an account in the Tap Electric app and link your Ratio charger here. In the Tap app, you can then set the settings for charging at dynamic rates based on your preferences. For more information, see:
Tap Electric
Ratio EV Charging App
With the Ratio EV Charging App, you have full control over your EV charger. For example, you can also find the charging history here.
To add a charger to the Ratio EV Charging app, the charger must be connected to the internet, the mobile phone must be connected to the internet, and Bluetooth must be enabled on the smartphone. Then, create an account in the Ratio App. After you have logged in, click on 'My charging stations' and then at the bottom on 'Add a charging station'. The app will now search via Bluetooth for a charger nearby, and your charger will appear on the screen. With the Bluetooth code provided with the charger, you can connect to the charger.
The Ratio App works with the following Ratio models: Smart, Solar, and io6.
Ratio's online models (Smart, Solar, and io6) support over-the-air updates. Ratio recommends installing available firmware updates as soon as possible. Firmware updates keep the charger's data security up to date and regularly add new features. Updates are performed sequentially, so it may be that the system offers multiple updates in succession. Please refer to the release notes on the Ratio website or in the AppStores for more information on new features and system improvements.
When a firmware update is available, the update icon will appear next to the charger in the "My chargers" screen.
1. Tap on the charger's button to install the update.
2. Tap on "Install Now" to install the update immediately or tap on "Install Later" to postpone the update to allow charging your car immediately.
The update notification will appear the next time you open the "My chargers" screen.
Note: Ensure that the charger remains powered during the update and is connected to the internet. Power/network interruptions can cause the update to fail.
The Ratio EV Charging App does not need to remain open during the update.
While the update is in progress, the icon will be displayed next to the charger in the "My chargers" screen. Please note that the update may take several minutes. After the update, the charger will restart and be ready for use.
NOTE: Do not use the charger during the update process.
3. After updating the charger's firmware, check in the AppStore or PlayStore if an update is available for the Ratio EV Charging App and update it if available. Regularly check for updates in the "My chargers" screen of the Ratio EV Charging App.
Note: Using an old version of the Ratio EV Charging app may lead to compatibility issues.
After enabling “Scheduled Charging” and setting the desired schedule, you do not need to press start; charging starts automatically at the set time. However, the Start button can still be used to immediately start a charging session.
Important: under 'Settings' in the App, Authorization should be set to 'Manual', not 'Plug & Charge'.
First, make sure the yellow circle is shown for several minutes.
1. Dynamic Load Balancing is active. The house is protected from overcharging. There is too much consumption in the home/office causing charging to stop.
Check: in the Ratio App, go to 'advanced settings', check the 'measured values'. Unplug the cable and make sure you are close to the charger. If you see a high value of say 20 amps at 'currents at sensor box' on one or more phases then this is the explanation. Turn off consumers such as a Jacuzzi, washing machine, air conditioner or heater to start charging again.
2. Is the charger in charging mode 'PureSolar'? If there is not enough excess solar power (more than PureSolar minimum charging current, normally 6 amps) the App will show the yellow circle.
Solution: wait until there is enough solar power output or choose another charging mode.
3. If the charger is connected to a back office via OCPP there may be SmartChargingProfiles active and because of this a yellow circle may be shown. For example, if charging on Dynamic Hourly Rates, charging may be paused at more expensive hours.
Important: The yellow circle does not mean that the car battery is full or has reached its charging target. Check with the customer if he has not set a charging goal in the Car (app). Also with an active weekly schedule, the yellow circle is not shown if there is no charging target.
Certain options are only active if you are connected to the charger via bluetooth or internet. Go through the following steps;
1. Did you download the Ratio App but are not logged in or did not create an account? If you are using the App as a 'guest' you can only start charging. Create an account and/or log in.
2. I cannot select certain options in the advanced settings. When a charging session is active or when the charging cable is in the car, settings cannot be changed for security reasons. Please remove the charging cable from the car first. If you still cannot select settings then, there is no bluetooth pairing between the charger and your smartphone or tablet.
- Get within bluetooth range of the charger
- Pair the charger (again) with Bluetooth. To do this, follow the following 2 steps:
1. On your smartphone or tablet; go to bluetooth setting and disconnect the pairing with the charging station
2. In the Ratio App, under 'my charging stations' click on 'change' or 'edit' at the top right. Delete the charging station by clicking on the trash can and add the charger again with the unique6-digit Bluetooth pairing code. This code is supplied separately with the charging station and an additional sticker is attached to the manual.
3. I cannot change the 'charging mode' from basic to Smart, SmartSolar or PureSolar
If Load Balancing is not active, you can only use the charger in Basic. Do you still want to charge on solar power or with load balancing? In the advanced settings, turn on Sensorbox. Make sure the Sensorbox is connected in the meter box.
4. I cannot set up scheduled charging.
For this you need to be connected to the internet. In the home screen of the Ratio App, after selecting your charging station, you will see an icon (wifi, bluetooth or wifi icon with line) in the lower left corner. If you don't see a wifi icon here, your charging station is not connected to the internet. Go to settings - wifi and connect to a stable network.
Dynamische Load Balancing
Ratio Sensorbox
The charging station protects your home or office from overcharging while the car charges at maximum speed. The charging speed is adjusted to the remaining consumption in your home or office. So you can always charge as fast as possible without worries.
The Sensorbox is the black box placed in the meter cupboard. With correct connection, the LED on the sensor box flashes three times, followed by a brief pause. This indicates the flow of electricity, per phase. Green means there is an excess of solar power, while red indicates energy is coming from the grid. For example, if the solar panel installation is connected to phase 1, the LEDs would be: green – red – red.
The sensor box receives power from the mainboard, and the LED will be red. In Smart and Solar modes, the LED will flash three times with a pause. If no solar energy is being generated, they will flash red. For instance, if energy is being generated on phase 1, the LED will flash as follows: green, red, red.
Yes, new Ratio chargers support integration with the P1 Port. You can check if your charger/sensor box is ready for this in 2 ways:
1. If the 'P number' of your charger (see Ratio App, found under my charging stations) is higher than ..8334
2. If the serial number on the sensor box (silver sticker, sensor box in the meter box) is higher than ..5098
Older versions of the Sensor Box can be connected with CT terminals.
To use the P1 port, follow these steps:
1. Verify that the smart meter meets the requirements as listed in the table below. If it does not, continue the installation process using CT terminals.
2. For now, the P1 port can only be used for applications where the grid connection is up to 63A.
3. Use the RJ12-RJ12 cable (supplied with the sensor box) to connect the P1 port of the sensor box to the P1 port of the smart meter. If the P1 port on the smart meter is already in use by another device, use a suitable 'P1 Hub' to expand the number of ports. A P1 splitter without power supply is not sufficient
4. Connecting the power cable to the 230V AC input of the sensor box is not necessary when using the P1 port.
5. After connecting the sensor box to the smart meter and the charger, turn on the charger and check the operation of the P1 communication in the following way:
- LED off: sensor box is not receiving power -> check RS485 wiring and see if charger is receiving power.
- LED on, solid orange: power to Sensor Box is on, but no communication between charger and sensor box -> check RS485 cable.
- LED on, continuous red: no valid P1 communication received -> check cabling (and P1 hub if necessary). Check if smart meter is in the list of supported meters. If not, go back to using CT terminals.
- LED flashes 3 times: when the LED flashes 3 times every 1.5 seconds, P1 communication is active.
Each time the LED flashes is about a phase, if it flashes red then there is consumption on that phase, if it flashes green then there is solar panel output on that phase.
For example, if there is yield only on phase 1 then the LED blinks consecutively: green, red, red.
6. Always compare either the blinking LED or the “Measured Values” in the Ratio EV Charging App with the actual consumption/output situation in the home to make sure the Sensor Box is working properly before you start using the charger.
When the Sensor Box is turned on, it waits 30 seconds for a message from the P1 port. If the Sensor Box does not receive a P1 message within 30 seconds of startup, the Sensor Box will automatically switch to CT terminal mode and the CT terminals will need to be connected to take advantage of load balancing.
Requirements to support smart meters:
- Baud rate: 115,200
- Message interval: <= 10s
Meters supported:
Iskra-AM550
Kaifa-MA105
Kaifa-MA105C
Kaifa-E0025
Kaifa-E0003
Kaifa-MA304
Kaifa-MA304C
Landis & Gyr-E350 ESMR 5.0
Landis & Gyr-E360 ESMR 5.0
Sagemcom-T211
ISKRA-MT382
Enexis T210-D ESMR5
Sagemcom XS210 ESMR5
Enexis ZIV
Kaifa-E0079
NOT supported meters:
Kamstrup-162
Kamstrup-351
Kamstrup-382
Landis E360 Smr 5.0
Sagemcom-T210-D
If you find a smart meter that is not on the list, please let us know if it works with this meter or not, so we can complete the list. You can send your finding on this to support@ratio.nl
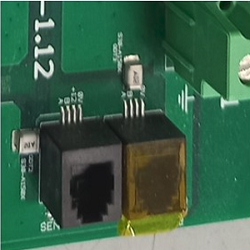
Since the spring of 2024, the wall chargers and sensor box have a green connector with screw connection. If a new sensor box is connected to an older charger, there are two different connections that can be combined. Below you can see the data cable connection for the sensor box in the previous (left) and new (right) situation. The order of connection (from left to right) is: A, B, +12V and GND.
Important: when you want to connect chargers, for power sharing, only A, B and GND should be connected in parallel to the sub charger(s) and not the +12V. This serves as the power supply for the sensor box
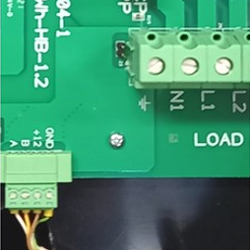
Connections
Continue reading or open the flyer with instructions.
In the Ratio EV Charging app, go to 'Settings', then 'Advanced Settings'. Make sure the charger is connected via Bluetooth.
Select 'OCPP settings' at the bottom of the screen.
Turn on the OCPP selector and then choose 'E-Flux' as the Open Charge Point Provider. You will now see your Charge Point ID, which you can easily copy to your clipboard.
The Charge Point ID has the format 'RATIO_Pxxxxxxxxxxxxxx'. Use the Charge Point ID to register the charger on the E-Flux portal.
Create an account with E-Flux for an AC Charging Station. Go to https://e-flux.io/nl/tarieven/ and follow the steps to create an account and enter the Charge Point ID (CPID). You can use the information from the clipboard or manually enter the CPID.
After activating OCPP, simply use an RFID charging card to start a charging session. The RFID symbol on the 'Charger Overview' screen is gray when no card is read and green when a card is successfully read.
All functions of the Ratio EV Charging app, such as Scheduled Charging and Smart/Solar modes, remain available when using OCPP.
Our latest Ratio Solar models and all Ratio io6 chargers are suitable for charging on Dynamic energy rates. This way, the charger can be controlled with smart software and start charging at the best/cheapest times. We do this charging on dynamic rates via a free link with Tap Electric. You can link your Ratio charging station via 'OCPP settings' with Tap. Then create an account in the Tap Electric app and link your Ratio charger here. In the Tap app, you can then set the settings for charging at dynamic rates based on your preferences. For more information, see:
Tap Electric
Frequently reported issues
Error 111 indicates that the charger cannot communicate with the sensor box. An installer can check if the wiring between the charger and the sensor box is properly connected.
If the car is unlocked, you can follow these steps in the Ratio App:
Open the app, go to settings, then cable lock, and while slightly pushing the plug into the charger, change the setting to "Always locked", then change it back to "Car unlocks". It is important to keep the cable pressed in during this entire process; the cable should now be able to be removed from the charger.
Do you see installation values that you don't expect? Contact your installer.
Is the charger connected to Wifi? Probably the Wifi reach is not optimal and the charger is losing connection to the Internet. We recommend improving the Wifi reach, for example by moving the modem or using a Wifi extender. An alternative is to connect the charging station to the Internet with a fixed Ethernet cable. For this purpose an RJ45 pig-tail cable is available inside the charger.
Please first ensure that you are within Bluetooth range of the charging station and that your smartphone is not connected to any other Bluetooth device. If the Bluetooth connection continues to give problems, you can disconnect or remove the connection to the Ratio charging station in your Bluetooth settings on your device. Then, in the Ratio App, go to 'My charging stations' and click on 'Edit' in the upper right corner. Remove the charging station and add the charger again using the 6-digit Bluetooth pairing code provided as a sticker on the manual.
An io6 needs to be connected to the internet as well as a back office (via OCPP settings in the Ratio App) to be able to charge via a charge card.
In the Ratio App, when OCPP is on, if you click on ‘my charging stations’ and select your charging station, you will see an icon of a pass. When the pass is successfully offered, this icon turns green.
When offering the charge card to the charger, the charger should beep several times.
The 1st beep is for the operation of the card reader in the charging station. If you don't hear a beep, the card reader may be faulty.
Then 2 short beeps says that the card is accepted and charging is taking place (provided there is enough energy available).
3 long beeps means the card is not accepted. Contact the back office
4 long beeps means OCPP is not on in the Ratio App. Go to settings - advanced settings - OCPP settings and choose a backoffice and turn on OCPP. Make sure the charger is also registered with the back office.
To stop the charging session, hold the charging card in front of the card reader on the charger again. One beep then follows, followed by three short beeps.

